H. P. Friedrichs (AC7ZL) Homepage


My Projects
Kella's Barbie Horse Wagon
Introduction
Dolls and their accessories are not something I know a whole lot about. I suspect that most normally-adjusted adult males are in the same boat. Yet, all of this changes in a heartbeat when one becomes the parent of, or in my case the grandparent of, a little girl.
Barbie is the queen of all dolls, an icon, and you'd be hard pressed to find a more quintessentially American toy. Barbie has appeared in numerous incarnations since 1959, but I think the most impressive facet of her reign has been the mind-numbing variety of accessories produced for her benefit.
Over the years, Barbie has piloted a lot of expensive vehicles. She has sailed yachts, flown aircraft, and driven sports cars like Corvettes and Porches. Forgive me, but I can't help feeling that Barbie sometimes comes off as a bit materialistic. Given my granddaughter Kella's interest in horses, and my desire to offer her a view of Barbie that is a little less jet-set and a little more salt-of-the-earth, I decided that a Barbie-scale horse and wagon might make a nice birthday present.
Wheels
This project literally began before I knew it had. My wife had an old decorative planter, parked on the back porch, that featured a set of four steel wheels. When the planter finally succumbed to sun exposure and rot, and she attempted to throw it into the trash, I intervened to salvage its wheels and axles. Even then, they vaguely reminded me of old-fashioned wagon wheels. As I tossed them into a box in the garage, my initial thought was that they might make fine accoutrements for a toy cannon.
Finding Barbie
When I decided to build Kella a Barbie wagon, my plan was to obtain a Barbie doll first. I figured that having the doll in-hand would help me to properly scale the various components of the wagon. There is no shortage of available Barbie dolls, but it does seem that the interest of adult collectors can drive the price of these dolls to absurd levels. In the end, I found one at a local chain store. Her miniskirt, purse, and pink go-go boots didn't exactly match the western style I was after. On the other hand, she was fairly inexpensive, and sufficiently articulated to allow here to be posed. Note that not all Barbies have bendable joints.
The Horse
The next task was to find a suitable horse. I have to admit that I was shocked at just how difficult it was to find the right one.
Most girls seem to have an affection for horses, and there is no end to the variety that can be found at a toy store. The problem is that none of the contemporary horse toys seem to be scaled to Barbie, and worse, none of them look like real horses. A space alien visiting from a distant planet, conducting research in a toy store, might reasonably conclude that all horses on earth are pink, with disproportionately large eyes, with wings, rainbow-colored manes, and absurdly long tails festooned with glitter. In fact, the only place I was able to find a halfway decent horse was on eBay. There, I located a properly-scaled animal manufactured for Barbie some time in the late 70's or 80's.
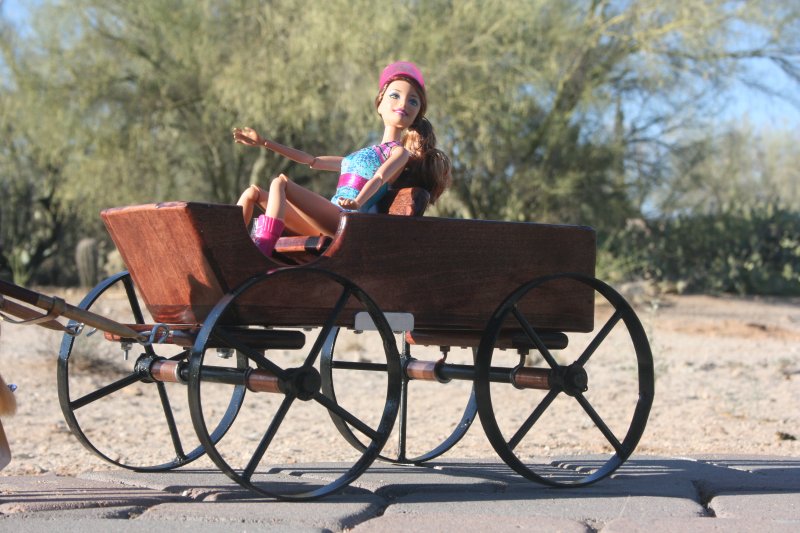
Figure 1: Barbie's Horse Wagon
The Wagon
Next, I gave consideration to the design of the wagon. I spent some time thumbing through books and surfing the Internet looking for photos of authentic wagons. In the end, I decided that an historically accurate toy was overkill. It was far more important that the toy be rugged, and suitable for carrying other toys (remember, Barbie has a lot of stuff!) If it merely resembled or suggested a period wagon of some type, that was good enough.
The design that emerged is a simple open-box affair fashioned from half-inch poplar. The front of the wagon is slanted outward, a stylistic detail that functions both as a dashboard and a place for Barbie to rest her feet.
In the center of the box, I installed a wooden seat. While the sample Barbie I purchased had jointed limbs and could be posed, there are limits to the flexibility of her joints. The wagon's seat was therefore sized, positioned, and slanted to allow my sample Barbie to be seated comfortably.
During fabrication of the wagon's sides, I used a hole saw to create semicircular relief in the walls just forward of the seat. These features, also stylistic in nature, are intended to make it easier for the wagon's driver to climb aboard.
The wagon's box was assembled with glue and small brads. When compete, it was sanded aggressively, stained, and then sealed with a few coats of polyurethane.
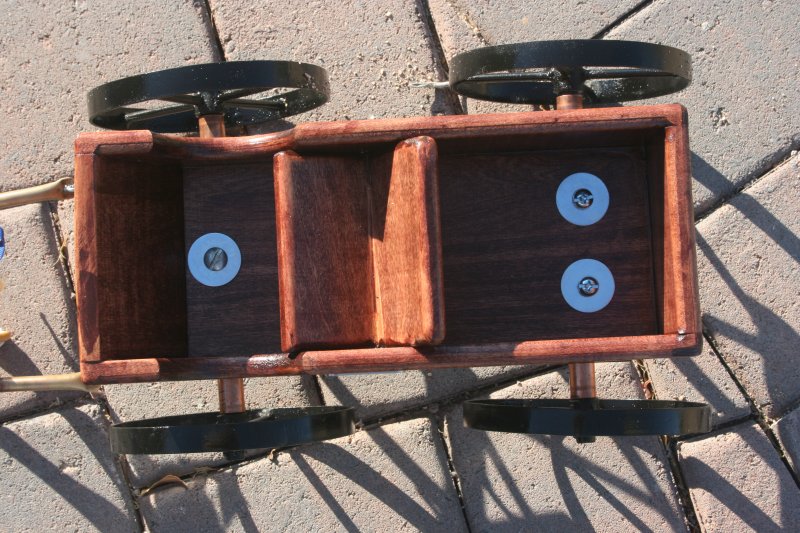
Figure 2: Internal details, including the bolts that secure the wagon's undercarriage assemblies
The Undercarriage
The wheels were mounted to the wagon box through a pair of undercarriages, which are partially visible in figure 1.
The rear-wheel undercarriage consists of a strip of 1/2-inch poplar, about two inches deep and as long as the wagon body is wide. A pair of #8 tee nuts were installed in holes drilled toward each end of the strip, and then fitted with eye bolts. The rear wheel shaft slides through the eye bolts. Bits of copper tubing act as spacers to keep the wheels positioned outward and clear of the eye bolts. I added some flat washers to the shaft as necessary, and secured the wheels from falling off the shaft with cotter pins.
The undercarriage was then fitted with a pair of 1/4-20 tee nuts. These can be seen in figure 2. I drilled a pair of holes through the floor of the wagon body, inserted a pair of 1/4-inch bolts with flat washers, and threaded them into the 1/4-inch tee nuts in the under carriage. This secures the undercarriage solidly to the body.
The construction of the front undercarriage is very similar, with two exceptions. First, the poplar strip in the front undercarriage is about three inches deep, not two. This allows it to protrude from the front of the wagon a little bit, and therefore provides an attachment point for the "horse shaft," the poles by which the horse pulls the wagon.
The other difference is the manner in which the front undercarriage is anchored to the floor of the wagon. In this case, I used one bolt, not two. The bolt is centered, and acts as a "king bolt" to provide a pivot point for steering. Instead of anchoring that bolt into a tee nut, I used a lock nut, the kind with the nylon insert. Flat washers were inserted, as necessary, to allow the front wheel undercarriage to to swivel easily for steering, without excessive mechanical "slop."
Needless to say, the wooden part of each undercarriage was stained and sealed with polyurethane.
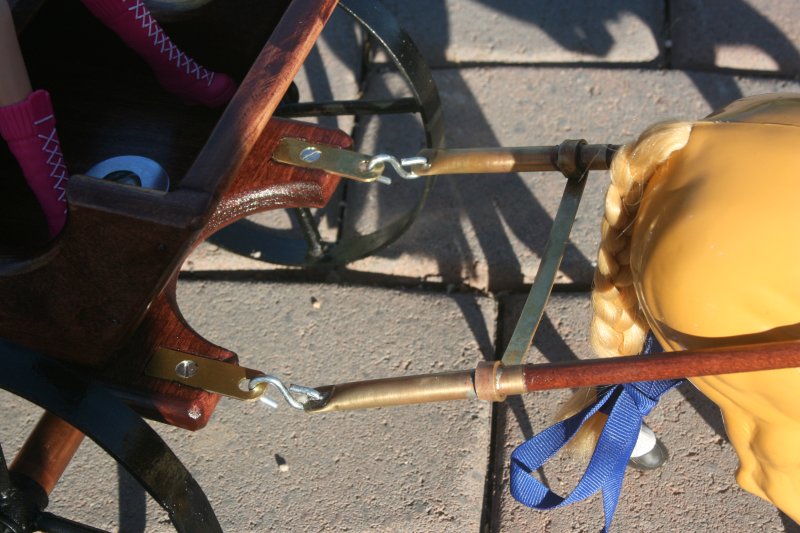
Figure 3: Details of the horse shaft. Note the brass H-frame, the wooden-dowel shafts, and the method by which the shaft assembly is coupled to the wagon.
The Horse Shaft
The horse shaft consists of an H-shaped metal frame, a pair of wooden dowels, and some assorted hardware to couple every thing together. This is the mechanism by which the horse pulls the wagon.
The H-frame was fashioned from hobby brass. I started with two short lengths of brass tube and a length of brass strip. The strip stock was cut to size, and then the ends were curled into loops. The tubes were inserted through the loops and soldered into place.
I inserted a length of wooden dowel into each of the frame tubes. The dowels are actually glued in, and won't come out under any normal play scenario. The dowels, like all the other wooden parts in this project, were stained and treated with urethane. I'll describe the harness-end of the dowels in just a moment.
The wagon-ends of the H-frame were flattened and drilled to accept small S-hooks. Each S-hook was squeezed closed at one end, to prevent it from falling out of the attachment points on the frame.
The free end of each S-hook couples to the front undercarriage. I fashioned two attachment points from bits of brass strap. The attachment points are inletted into the front undercarriage and secured with #6 screws and nuts. The S-hooks are easily engaged and disengaged from the attachment points on the undercarriage, making it easy to decouple the horse from the wagon as Barbie sees fit.
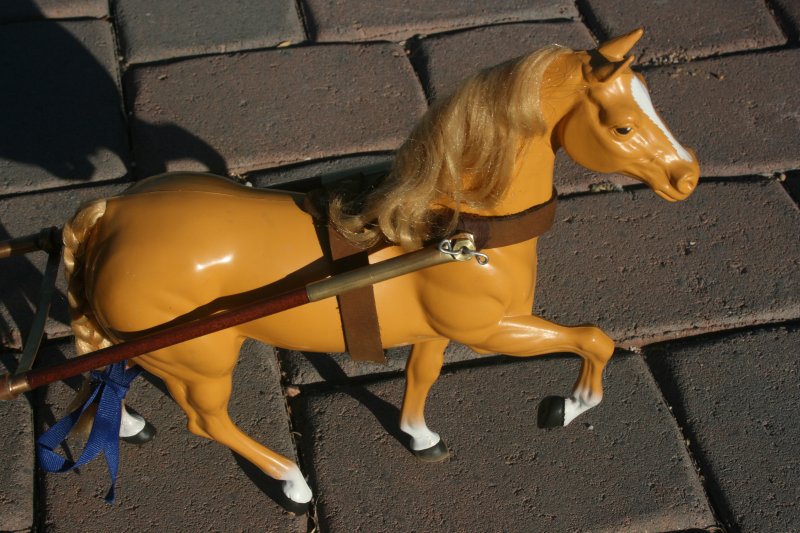
Figure 4: The horse's leather harness.
The Harness
I suspect that anyone with any real knowledge of horses and tack will laugh at my harness. The configuration I came up with is the product of my own imagination. I stitched it together from some bits of leather strap. I installed a tiny buckle (purchased at a sewing store) at the horse's belly. This allows the harness to be removed from the horse entirely.
As evident in the photos, the horse shafts (at the harness end) are also terminated with brass tube. The ends of the tubes were flattened and drilled. The shaft ends are coupled to the leather harness with spindles. This type of attachment provides a pivot point which allows for compliant motion as the horse or wagon moves.
Each spindle, comprised of steel wire, is shaped like a staple but with very long legs. The legs are passed through little holes poked through the leather straps. Once through the leather, the legs are folded over and crossed, then bent to converge to form the spindle. The spindle is passed through the hole in the terminators at the end of each dowel rod. Washers or small nuts are added, as necessary, to act as spacers or bushings. The legs of each spindle/staple are then separated again, folded over, and terminated with decorative loops. The loops blunt the ends of the wire, which might otherwise scratch or poke little fingers.
An example of one of these attachement points can be seen on the harness strap above the horse's shoulder in figure 4. Note the brass shaft end, the brass-nut-bushing, and spindle/staple legs separated and folded to secure it all.
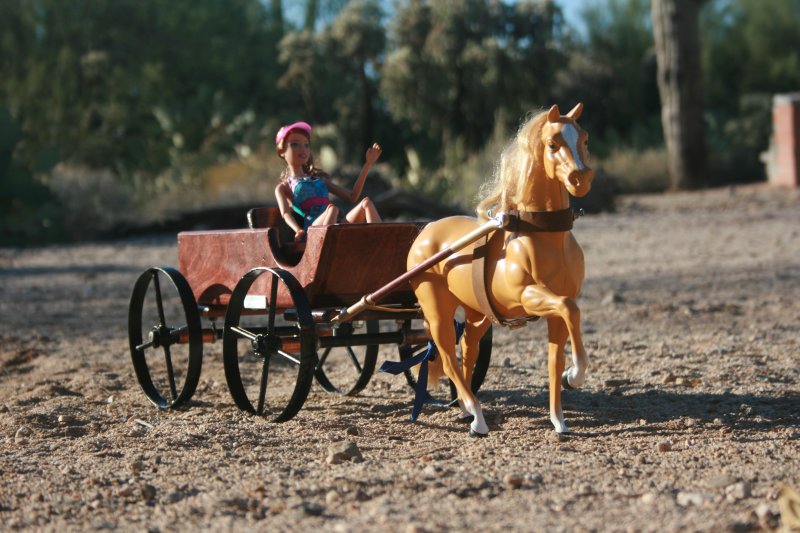
Figure 5: Barbie on her way to Kella's birthday party.
Conclusion
On tinkering with the wagon, I noted that sharp turns caused the front wheels to pivot so far that the wheels dug into the sides of the wagon box and left marks. This is really not a big deal, as this is simply a toy.
Of course, being an engineer and never being satisfied to leave well enough alone, I cut two short lengths of aluminum angle stock, and attached them to the underside of the wagon box with small sheet metal screws. These bits of aluminum are positioned to intercept and prevent contact of the wheels with the sides of the wagon. (They can be seen as silver rectangles on the walls of the wagon in figures 1 and 5.) The scratches left in the aluminum are not noticeable.
Figure 5 shows Barbie riding through Tucson on her way to Kella's birthday party. Judging by the look on Kella's face when Barbie arrived, I think that she was pleased.
I realize that there are thousands of must-have toys that a parent or grandparent can buy for a child. Let's face it: The toy industry and the Madison Avenue agencies that work for them do a frightfully good job of convincing our kids that life is not complete without one of their Chinese-made, injection-molded plastic, battery-powered pieces of wonder-junk.
On the other hand, I believe that the most valuable gift you can give a child is a bit of yourself-- your time, your attention, and your talents. Long after Kella has outgrown her dolls, she'll still have something that most of her friends will not... a handmade one-of-a-kind reminder of how how much Grandpa loved her.
(revised 02/05/13)