H. P. Friedrichs (AC7ZL) Homepage


My Projects
Spiked Punch:
A Fast Computer Controlled Automatic Card Punch
Introduction
There are few signs of middle age more certain than one's emerging tendency to begin sentences with the phrase, "When I was your age..." This is generally followed by some narrative that illustrates that whatever it was that one had to do "way-back-when" was infinitely more difficult or more unpleasant than that same task is nowadays. In other words, "You youngsters have it easy."
Setting aside those stories of churning butter or walking to school in blizzards, every once in a while, there is actually a basis for this claim. For example, most contemporary computer whizzes, who develop their object-oriented code from within GUI-based integrated development environments, would be absolutely lost if asked to develop software the way it used to be done-- with punched cards.
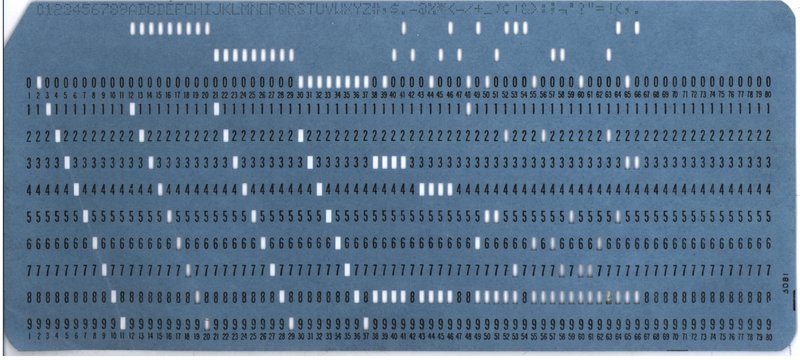
(A computer punched card, Source:Wiki, Photo: A Reinhold)
Punched Cards
The punched cards I'm talking about were made of paper, about as thick as your average index or recipe card, and measured 7-3/8 inches by 3-1/4 inches. Information was stored on the card in the form of punched holes. The card was mapped as 80 columns with 12 rows each. Patterns of holes in each column represented a character stored in that column, and might consist of a numeric digit, a letter, or a punctuation mark. To allow for human readability, it was common for the equipment that punched the cards to also print the corresponding character above each column in black ink.
My introduction to the punched card came in the early 80's when I took COBOL and FORTRAN programming classes at my high school. Programs were planned out on paper, and then written by hand in a notepad. When you had some confidence that what you had conjured might actually work, the next step was to copy those instructions onto punched cards. This was done with a large machine called a keypunch.

(The IBM 029 Keypunch machine, source: Wiki, author: Waelder)
Our school had two IBM 029 keypunches. As you can see from the illustration, the keypunch is a desk-sized affair. The machine had an input hopper, in which blank cards were stored, a keyboard for data input, and an output hopper that collected cards after they had been punched. A certain key on the keyboard would advance a card from the input hopper (on the right) into the punching mechanism. Thereafter, every time you touched a key on the keyboard, a loud "kerchunk" could be heard. When you were through typing whatever was to be stored on that particular card, an eject key advanced the card to the output hopper on the left.
Note that since there is no way to un-punch a hole once it has been made, there are no provisions on a keypunch for a "delete" or "do-over" key. If you make a mistake, you eject the card and throw it away. Then you start over.
The finished stack of cards was called a "card deck." Since one card was required for each line of source code in the program you were writing, even simple programs could be many dozens or even hundreds of cards in length.
The way the computing process worked at my school, was this: You'd wrap your completed card deck with some heavy rubber bands and hand them in to the teacher. Certain days of the week, he'd run them down to wherever the township's computing facility was, load your cards into the mainframe's reader, and then compile and run your program. He'd collect whatever results came off of the printer, and then, a few days later, you'd receive the printout along with your deck. If the program didn't work as expected, you would punch some new cards, add them to the deck, toss a few others out, re-sort by hand, and then resubmit them the deck for a new run.
If this process doesn't already strike you as cumbersome and time-consuming, let me add the following... If your deck was lost or mangled by the computer, you faced the prospect of having to retype and re-punch the entire card deck. If you ever dropped your deck (and I had seen it done more than once), you may as well have lost it. The ink ribbons in the keypunch machines were not well maintained, so as often as not, the cards were not human readable, and were therefore all but impossible to return to their proper order.
In any case, with only two keypunch machines available for an entire class of students, you could always count on waiting in line for your chance to punch another card.
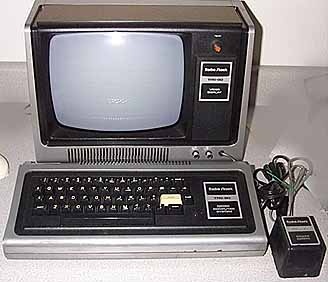
(The TRS-80 Model I, source: Wiki, author: T Garuti)
Enter The TRS-80
One of the first successful microcomputers, priced for use by the the general public, was Radio Shack's TRS-80 Model 1. This was a Z-80 based computer running at 1.77 MHz. The base-model came with 4K worth of RAM, but could be expanded to 16K. A version of the BASIC programming language, written by Microsoft, was stored in ROM.
The computer came with a black-and-white television monitor. The video circuitry in the computer was set up to display 16 lines of up to 64 characters, upper-case only.
Each computer also came with a cassette deck and special cabling, which allowed programs and data to be written to and read from standard audio tape.
A Flash Of Inspiration
Around the time I was taking my COBOL and FORTRAN classes, the school procured a dozen TRS-80's to support the teaching of BASIC. One day, as I found myself waiting for access to the keypunch, I noticed that there was rarely ever a wait for someone who wanted to use one of the TRS-80s. "Wouldn't it be great," I thought, "if there was some way I could use the TRS-80s to punch my cards?" Later that night, I mapped out a plan as to how this might be accomplished.
First, I wrote a very simple editor program. The editor allowed you to create a virtual card deck which was stored in an array. Certain keystrokes allowed you to insert, delete, move, and reorder cards at will. Note that in the editor, there was no penalty for making a typographical error. If you made a mistake, you could use the backspace key to undo it. When you were satisfied with your work, you could command the editor to dump the data onto a cassette. You could load, edit, and re-save the deck as often as you wished.
The second step of the plan required the design of an interface between one of the school's TRS-80s and one of their IBM 029 keypunches. Schematics were not available for the keypunch, and the Internet did not yet exist, at least as far as I was concerned. This meant that the only way to figure out how the keypunch worked was to reverse-engineer it, and that required taking it apart. Amazingly, my teacher granted me permission to do this.
I should mention that, around this time, one of the school's dot-matrix printers had died, due to a coil in the print head that had burned up. At the time, a printer like that cost more than a thousand dollars, so this was a sizable loss to them. Assuming they had nothing to lose, the school allowed me to take it home on the off chance that I could fix it. I dismantled the print head, removed the burnt coil, and cleaned out the melted plastic with a knife. As I recall, I fashioned a new bobbin from cardboard, and rewound the coil by hand. When I put everything back together, the printer worked fine. In retrospect, it was probably my success with that printer repair that persuaded my teacher to allow me to take a crack at the keypunch.
Details about the internals of the punch have faded from my memory, but I seem to recall an internal power supply on the order of 48 volts, which, when applied to solenoids inside the machine, caused holes to be punched and characters to be printed in ink on the card. Through trial and error, I eventually developed a character map in my notebook that described which combinations of solenoids resulted in the production of any desired character on the card.
With this information, I set out to develop an interface between the keypunch and the TRS-80. The TRS-80 had an expansion connector at the rear of the computer, through which data, address, and bus control signals could be accessed. Again, time has faded my memory with regard to specific circuit details, but what is clear is that I used TTL gates to decode certain I/O addresses, which triggered the capture of bit patterns off of the computer's data bus. These patterns were stored in latches, and then applied to a bank of power transistors, which in turn fired the solenoids in the keypunch.
So, with the construction of the interface complete, there was one remaining task-- the creation of the punching software. This program resided on the TRS-80 connected to the keypunch. Its function was simple. A user would insert his/her cassette tape into the deck attached to the machine, and start the program. The computer would read the punch card images off the tape, and automatically drive the keypunch to punch the corresponding cards.
For those who have never had the pleasure to work with punched cards, let me summarize the benefits of this system:
1) Students would no longer have to wait for an available keypunch to work on their programs. They could sit down at any available TRS-80 and work any time they wanted. Some of us owned our own TRS-80s, and could even work in the comfort of our own homes.
2) The editor allowed for easy manipulation of card decks. Mistakes were easy to correct. No cards were wasted when typographical errors were made.
3) Storing the card deck image on cassette provided insurance against the possible loss or destruction of the deck.
4) The automatic punching process was very fast. A cassette could be loaded and a full deck punched in minutes. This made much more efficient use of the keypunch, and nearly eliminated any wait for use of the equipment.
Back To The Future
Nearly 30 years after events I just described, an old friend confided that he had, in his garage, the old keypunch interface I had created. Just how he came into possession of it is a story for another day, but he recently offered to ship it to me. When it arrived, it was dusty and showed signs of its age, but I was delighted at this opportunity to travel back in time and look at something I had invested so much thought and effort into.
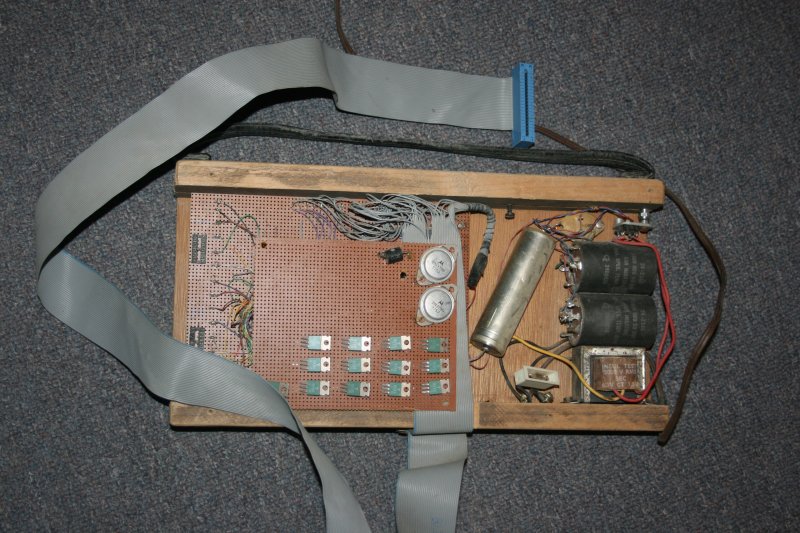
The frame of the device is a U-shaped affair constructed of plywood and a couple of 1x2 runners at each end. As evidenced by the screw holes in the runners, the top of the device was once covered with a piece of plexiglass, intended to protect and insulate the internals. Regrettably, this part is now missing. The black strap at the top of the device was a piece of belt which formed a carrying handle. When installed, the interface was hidden in a compartment inside the keypunch machine itself.
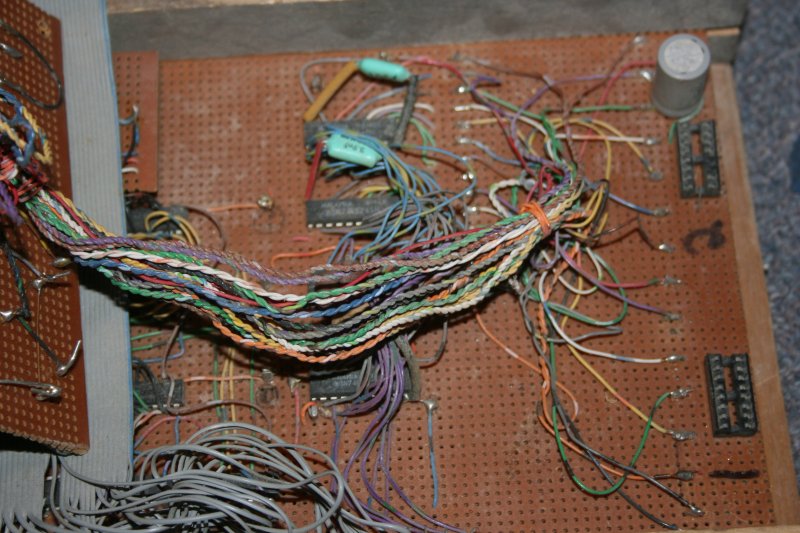
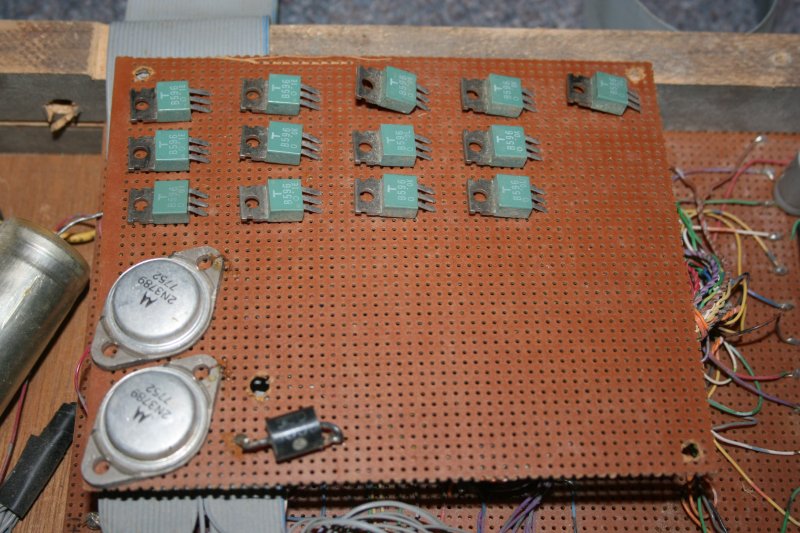
The circuitry was laid out on phenolic perfboard, and wired point-to-point with telephone wire. The logic board rests in card-guide slots that were cut into the 1x2s. I can't recall now how the transistor board was mounted, though I suspect that it was affixed to the plexiglass somehow.
The power transistor board features 15 transistors. The first twelve were used to select the holes to be punched in the card. The thirteenth transistor initiated the punching operation. Transistor #14, one of the large components in the TO-3 package, was responsible for firing the solenoid that loaded a blank card into the punching mechanism. Transistor #15, in similar fashion, triggered a solenoid to eject a punched card and stack it in the output hopper.
The flea clips, sockets, ribbon cable, and chips used were once standard fare at Radio Shack. Sadly for many of us, Radio Shack has changed its business model and is no longer the haven for builders and experimenters that it was when I was young.
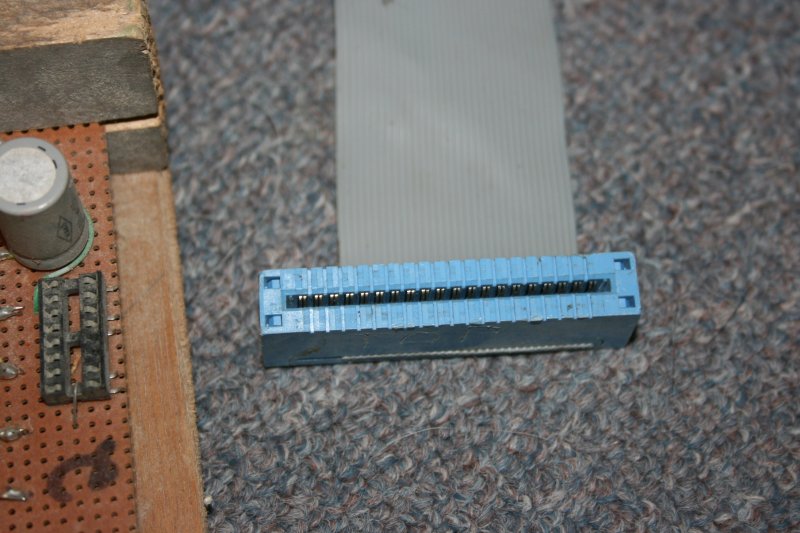
As described earlier, the interface was connected to the TRS-80 through its expansion port. The edge connector I used was a 40-pin connector, but as evidenced by the ribbon cable, the computer's port probably only had 34 pins.
Inside of the keypunch, I soldered wires to the terminals of the various solenoids and then terminated the wire bundle with DIP headers. These headers plugged into the DIP sockets on the logic board, labeled "1" and "2."

The power supply for the keypunch interface is a sight to behold... It's scary looking. A 12-volt transformer and bridge rectifier charges a bank of electrolytic caps. This DC current is fed to a 3-terminal 5-volt regulator in a TO-3 package, whose output receives further filtering with another cap. Funny... After all these years, I can still envision the old Montgomery Ward's stereo system those black electrolytic caps were salvaged from.

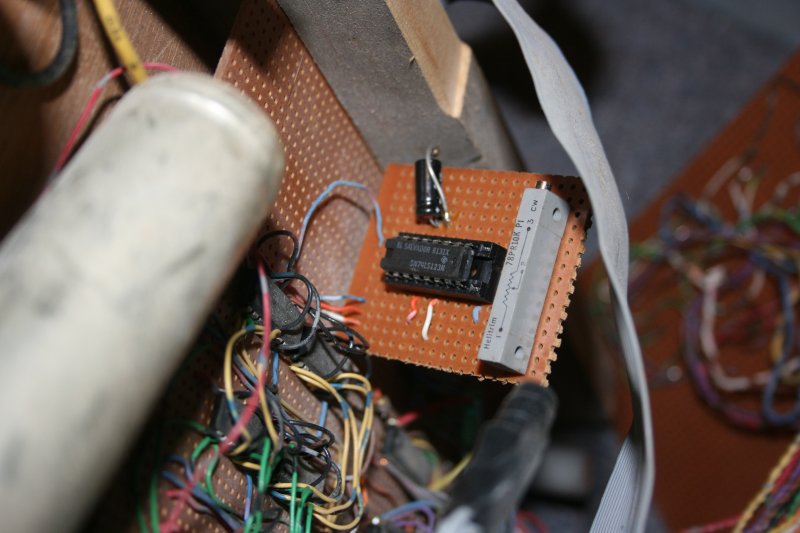
An interesting feature of the logic circuit is a 74123 one-shot (timer) located on a small board attached to the logic board. Obviously, I added this as an afterthought. Its exact purpose escapes me now, but having contemplated it, I think it was used in some fashion to pace the rate at which the solenoids in the keypunch could be fired. Even a 1.77 MHz machine running interpretive BASIC can toggle an I/O line much faster than a keypunch solenoid can respond, if it's not restrained in some fashion.
Knowing what I know now, there is much here that should have been done differently. On the other hand, a lot of this project was done just right, and any way you slice it, it worked as intended. Overall, it's not a bad accomplishment for a high school kid who did all the work himself.
As the result of the kindness of an old friend, I've recovered a piece of my distant past. This has given me the opportunity to relive some of the excitement I felt when the computer revolution was still in its infancy, and allowed me to celebrate my minor contribution to the then-nacent art of microcomputer hacking.
(first rev 01/04/11)